👉 Read this article in English.
基礎編で見ていただいたとおり、ノードガーデンは下記のシンプルなルールがその全てです。
- 点(ノード)を配置する
- ノード間に線を引く
クリエイティブ・コーディングの定番「ノード・ガーデン」:基礎編
ルールがシンプルなだけに、ノードの配置や線の引き方の工夫次第でいろんな表現が可能になります。今回の「応用編」では、この配置と線に工夫を加えた様々な作例をご紹介します。皆さんの制作の参考になれば幸いです。
ノードガーデンのアニメーション
まずは、ノードを動かしてアニメーションを作ってみます。ノードをキャンバス内で回転移動させた例がこちらです。
/*
 * Node Garden 応用編 サンプルコード
 * 回転するノードのアニメーション
 */

const w = 640;
const h = 480;
const nodeNum = 12;
const frmRate = 24;
const baseR = Math.min(w, h);
const rangeS = baseR * 0.1;
const rangeL = baseR * 0.3;
const nodes = new Array();

function setup() {

	// キャンバスの設定
	createCanvas(w, h);

	// アニメーションの設定
	frameRate(frmRate);

	// ノードを配置
	for (let i = 0; i < nodeNum; i++) {
		let t = random(TWO_PI);
		let r = baseR * map(i, 0, nodeNum, 0.1, 0.5);
		nodes.push({
			x: r * cos(t),
			y: r * sin(t),
			r: r,
			t: t
		});
	}
}

function draw() {

	// アニメート
	for (let i = 0; i < nodeNum; i++) {
		let n = nodes[i];
		n.t += PI * n.r * 0.0001;
		n.x = n.r * cos(n.t);
		n.y = n.r * sin(n.t);
	}

	// 描画
	translate(w * 0.5, h * 0.5);
	background(240);

	// 線を引く
	noFill();
	stroke(0);
	strokeWeight(3);
	for (let i = 0; i < nodeNum - 1; i++) {
		let n = nodes[i];
		for (let j = i + 1; j < nodeNum; j++) {
			let m = nodes[j];
			let d = dist(n.x, n.y, m.x, m.y);
			if (d < rangeL && d > rangeS) {
				line(n.x, n.y, m.x, m.y);
			}
		}
	}

	// ノードを描画
	fill(255);
	stroke(0);
	strokeWeight(2);
	for (let i = 0; i < nodeNum; i++) {
		let n = nodes[i];
		circle(n.x, n.y, 20);
	}
}
とってもシンプルなアニメーションですが、なかなかどうして、面白い動きを見せてくれます。ここにもうひと工夫加えて、ノード間の距離によって線の太さを変えてみましょう。
if (d < rangeL && d > rangeS) {
  let w = 3 * sin(map(d, rangeS, rangeL, 0, PI));
  strokeWeight(w);
  line(n.x, n.y, m.x, m.y);
}
近い過ぎたり遠すぎたりすると細くなるようにしました。ひっぱられたゴムがびよーんと伸びて、最後にはプチッと切れてしまうような、そんな「粘り」みたいなものが感じられるようになり、面白みが増したと思います。
これと同じ考え方で作られた作例が、前回も紹介したこちらです。コードは Processing です。
The node-garden animation nodes go back and forth on a straight line.
ノードの動かし方は直線運動だったり、イージングを入れたり、ランダムウォークだったりといろいろ考えられます。無限に作れそうですね。
ノードを規則的に配置
「基礎編」ではノードをランダムに配置していました。ここでは規則的な配置を試してみます。
グリッド配置
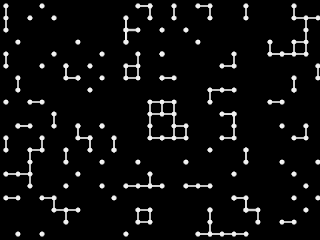
ノードをグリッド(マトリックスとも)上に等間隔で配置してみた例がこちらです。
/*
 * Node Garden 応用編 サンプルコード
 * ノードをグリッド配置
 */

const w = 640;
const h = 480;
const nodeNum = 200;
const nodes = new Array();

function setup() {
	createCanvas(w, h);
	noLoop();

	// グリッド上にノードをセット
	const step = min(w, h) * 0.05;
	for (let i = 0; i < nodeNum; i++) {
		nodes.push(createVector(
			floor(random(w / step)) * step,
			floor(random(h / step)) * step
		));
	}

	// ノードガーデンを描画
	background(0);
	push();
	translate(step * 0.5, step * 0.5);
	fill(240);
	stroke(240);
	strokeWeight(step * 0.1);
	for (let n of nodes) {
		for (let m of nodes) {
			let d = dist(n.x, n.y, m.x, m.y);
			if (d > step * 1.3 && d < step * 2.1) {
				line(n.x, n.y, m.x, m.y);
			}
		}
		circle(n.x, n.y, step * 0.3);
	}
	pop();

}
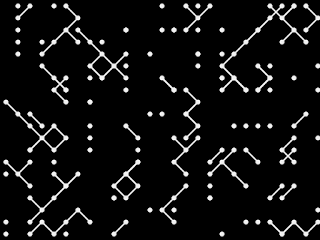
規則性があるものもなかなか魅力的ですね。なんだか「コンピュータ」って感じがしませんか?この例で線を引く条件を変えると、また別の表情の絵を描くことができます。
例えば、この条件だと、上下左右隣り合ったノード間だけの線になります。
if (d > step * 0.9 && d < step * 1.1) {
これなら斜め隣り同士。
if (d > step * 1.3 && d < step * 1.5) {
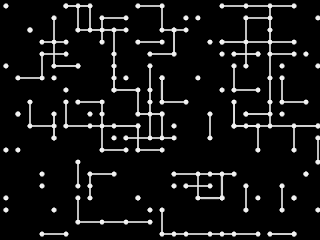
これは上下左右2個隣りのノード間だけ。少しトリッキーな感じが出ますね。
if (d > step * 1.9 && d < step * 2.1) {
最初の例は、これと「斜め隣り同士」とのあわせ技です。
if (d > step * 1.3 && d < step * 2.1) {
同じ作り方で、大小のノードガーデンを erase() と絡めてこんな絵づくりも可能です。
ストレンジ・アトラクターで配置
アニメーションの作例でノードを動かしましたが、その動いた軌跡のプロットを全てノードとするのも面白いと思います。同じ考え方で、ベクターフィールドでの軌跡や、ストレンジ・アトラクターの計算結果をノードとしてプロットするのもいいですね。
Processing の作例を置いておきます。こちらは De Jong アトラクターをノードの配置に用いた作例です。どうです?気持ち悪いでしょう?
Weird tentacles with the De Jong attractor.
DLA で配置
DLA(Diffusion-limited aggregation 拡散律速凝集)を使うと、珊瑚のような模様を描くことができます。
DLA のアルゴリズムでの衝突判断の距離を大きくとった、凝集後の粒子の位置をノードとして使っても面白いです。
こちらも Processing での作例になります。ここで使っているのは厳密には DLA ではありません。より簡便なアルゴリズムで DLA 似の描画ができる、「疑似 DLA」とでも言うべき手法を使いました。この手法について興味があれば、下記の記事を参照ください。
ブラウン運動もランダムウォークも無し! Processing で DLA 風の画像を作成
線を引く条件を変える
次は、ノード間に線を引く条件に工夫を加えてみます。
角度の条件
距離ではなく、ある角度のときだけ線を引くという条件を入れてみます。
この作例では東西南北の角度付近にきたノード同士に線を引いています。ノードを動かしてアニメーションにすることで、面白い見た目になりました。これも Processing での作例になります。
How I made this creative coding animation of a strange kind of node garden.
グリッド上のノードでの上下左右と斜めだけなら、角度の判断を入れなくても距離の判断だけで可能です。方法は前述「グリッド配置」でのとおりです。
ノードの属性を条件に
ノードに属性(例えば色)をもたせて、同じ属性のノード同士を線で結ぶという考え方もできます。
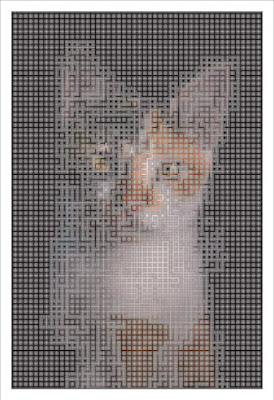
この「同じ属性同士」という条件と、先に紹介した「グリッド配置での上下左右隣り合ったノード」という条件を合わたノードガーデンで、写真を加工する作例を作りました。
コードはこの記事の最後に付けておきます。
手法は有限でも、その表現方法は無限!
今回紹介した作例はノードガーデンの応用例のほんの一部に過ぎません。シンプルなルールだからこそ、工夫しだいで面白い作品がいろいろと作れます。クリエイティブ・コーディングの手法は有限でも、その表現方法は無限です。
ぜひ楽しんでみてください。面白い作品ができたら Twitter とかで私にも見せてくださいね。deconbatch とのや・く・そ・く、ね。
色が同じノードを線で結ぶイメージプロセッシングのコード例
コードは Processing で書いています。GPL で公開します。ライセンス条項にのっとってご自由にお使いください。
/**
 * Purrid.
 * image manipulation of the node garden on the grid.
 *
 * @author @deconbatch
 * @version 0.1
 * @license GPL Version 3 http://www.gnu.org/licenses/
 * Processing 3.5.3
 * 2021.10.17
 */

void setup() {
  size(1080, 1080);
  colorMode(HSB, 360.0, 100.0, 100.0, 100.0);
  smooth();
  noLoop();
}


void draw() {

  int gridDiv    = 70;
  int caseWidth  = 30;
  int baseCanvas = width - caseWidth * 2;

  PImage img = loadImage("your_photo.jpg");
  float rateSize = baseCanvas * 1.0 / max(img.width, img.height);
  img.resize(floor(img.width * rateSize), floor(img.height * rateSize));
  println(int(img.width));
  println(int(img.height));

  // nodes on the grid
  int gridStep    = floor(max(img.width, img.height) / gridDiv);
  ArrayList<Node> nodes = getGridNodes(img, gridStep);

  translate((width - img.width) / 2, (height - img.height) / 2);

  drawBackground(img, gridStep);
  drawLines(nodes, gridStep, 0.0, 3.0);
  casing(caseWidth, img.width, img.height);
  saveFrame("frames/pd0001.png");

  drawBackground(img, gridStep);
  drawLines(nodes, gridStep, 0.5, 2.0);
  casing(caseWidth, img.width, img.height);
  saveFrame("frames/pd0002.png");

  drawBackground(img, gridStep);
  drawLines(nodes, gridStep, 1.5, 0.5);
  casing(caseWidth, img.width, img.height);
  saveFrame("frames/pd0003.png");

  exit();

}


/**
 * getGridNodes : returns node on the grid as Node array
 */
public ArrayList<Node> getGridNodes(PImage _img, int _step) {

  ArrayList<Node> nodes = new ArrayList<Node>();
  _img.loadPixels();

  // centering the grid
  int iXMax = ceil(_img.width * 1.0 / _step);
  int iYMax = ceil(_img.height * 1.0 / _step);
  int rXDiv = floor((_img.width - iXMax * _step + _step) * 0.5);
  int rYDiv = floor((_img.height - iYMax * _step + _step) * 0.5);
  for (int iX = 0; iX < iXMax; iX++) {
    for (int iY = 0; iY < iYMax; iY++) {
      int rX = iX * _step + rXDiv;
      int rY = iY * _step + rYDiv;
      if (rX < _img.width && rY < _img.height) {
        int pixIndex = floor(rY * _img.width + rX);
        nodes.add(new Node(
                           rX,
                           rY,
                           hue(_img.pixels[pixIndex]),
                           saturation(_img.pixels[pixIndex]),
                           brightness(_img.pixels[pixIndex])
                           ));
      }
    }
  }

  return nodes;

}


/**
 * drawBackground : draw mesh background
 */
private void drawBackground(PImage _img, int _step) {

  _img.loadPixels();

  rectMode(CENTER);
  stroke(0.0, 0.0, 90.0, 100.0);
  strokeWeight(0.5);
  background(0.0, 0.0, 0.0, 100.0);

  // centering the mesh
  int iXMax = ceil(_img.width * 1.0 / _step);
  int iYMax = ceil(_img.height * 1.0 / _step);
  int rXDiv = floor((_img.width - iXMax * _step + _step) * 0.5);
  int rYDiv = floor((_img.height - iYMax * _step + _step) * 0.5);
  for (int iX = 0; iX < iXMax; iX++) {
    for (int iY = 0; iY < iYMax; iY++) {
      int rX = iX * _step + rXDiv;
      int rY = iY * _step + rYDiv;
      if (rX < _img.width && rY < _img.height) {
        int pixIndex = floor(rY * _img.width + rX);
        fill(
             hue(_img.pixels[pixIndex]),
             min(5.0, saturation(_img.pixels[pixIndex])),
             map(brightness(_img.pixels[pixIndex]), 0.0, 100.0, 40.0, 70.0),
             100.0
             );
      } else {
        fill(0.0, 0.0, 60.0, 100.0);
      }
      rect(rX, rY, _step, _step);
    }
  }
}


/**
 * drawLines : draw lines between nodes that have the same color and have some distance.
 */
public void drawLines(ArrayList<Node> _nodes, int _step, float _distBase, float _weight) {

  float rangeShort = _step * (_distBase + 0.6);
  float rangeLong  = _step * (_distBase + 1.3);

  for (Node nFrom : _nodes) {
    boolean alone = true;
    noFill();
    for (Node nTo : _nodes) {
      float divDist = dist(nFrom.x, nFrom.y, nTo.x, nTo.y);
      float divHue  = abs(nFrom.hueVal - nTo.hueVal);
      if (
          divDist > rangeShort && divDist < rangeLong  // within range
          && (divHue > 355.0 || divHue < 5.0)          // nealy same color(hue)
          ) {
        strokeWeight(map(divDist, rangeShort, rangeLong, 2.0, 0.1) * _weight);
        strokeCap(ROUND);
        stroke(
               nFrom.hueVal,
               nFrom.satVal,
               nFrom.briVal,
               100.0
               );
        line(
             nFrom.x,
             nFrom.y,
             nTo.x,
             nTo.y
             );
        alone = false;
      }
    }
    if (alone) {
      noStroke();
      fill(
           nFrom.hueVal,
           nFrom.satVal,
           nFrom.briVal,
           100.0
           );
      ellipse(
              nFrom.x,
              nFrom.y,
              _weight * 2.0,
              _weight * 2.0
              );
    }
  }
}


/**
 * casing : draw fancy casing
 */
private void casing(int _casing, float _w, float _h) {
  rectMode(CORNER);
  fill(0.0, 0.0, 0.0, 0.0);
  strokeWeight(_casing + 4.0);
  stroke(0.0, 0.0, 30.0, 100.0);
  rect(-_casing * 0.5, -_casing * 0.5, _w + _casing, _h + _casing, 10.0);
  strokeWeight(_casing);
  stroke(0.0, 0.0, 100.0, 100.0);
  rect(-_casing * 0.5, -_casing * 0.5, _w + _casing, _h + _casing, 10.0);
}


/**
 * Node : draw and hold location and color.
 */
public class Node {

  public  int   x, y;   // coordinate of node
  private float hueVal; // hue value of node
  private float satVal; // saturation value of node
  private float briVal; // brightness value of node

  Node(int _x, int _y, float _c, float _s, float _b) {
    x = _x;
    y = _y;
    hueVal = _c;
    satVal = _s;
    briVal = _b;
  }

}

/*
Copyright (C) 2021- deconbatch

This program is free software: you can redistribute it and/or modify
it under the terms of the GNU General Public License as published by
the Free Software Foundation; either version 3 of the License, or
(at your option) any later version.

This program is distributed in the hope that it will be useful,
but WITHOUT ANY WARRANTY; without even the implied warranty of
MERCHANTABILITY or FITNESS FOR A PARTICULAR PURPOSE.  See the
GNU General Public License for more details.

You should have received a copy of the GNU General Public License
along with this program.  If not, see <http://www.gnu.org/licenses/>
*/


